CASE-ing Tuesday #432 Stars At Night Stamp Set

My card was CASE’d from page 59 of the 2023 – 2024 Holiday Catalog. Each week we makeover a card from the current Stampin’ Up catalog and then share it on our Facebook Group. You can join our CASE-ing Tuesday Facebook Group to see more samples and/or share your own card with us. It’s a great way to improve your stamping and challenge yourself to try new styles. I hope you will join us!

 I decided  for my card this week I would make a Christmas card using my new stamp set I just got!  I love working with sketches that have the measurements on them. The cool thing that a sketch provides is a creative idea to start your card off with! As you can see the sample card has totally different colors and supplies used. You just have to decide what kind of card you are wanting to create with the sketch and just starting having fun putting it all together!

At the bottom of my post are the supplies that I used to create my card. I stamped the sentiment on a scrap piece of the Designer Series Paper. I used my Paper Snips to cut apart to fit my rectangular layer!

Thanks for stopping by!


Paper Pumpkin Possibilities Meaningful Flowers

Paper Monthly Blog Hop

Time for this months Paper Pumpkin Possibilities Blog Hop with my fellow Stampin buddies!  As you hop along you will see alternative ways we have used the kit to share more ideas to share!. We all love comments! So, as you hop to each blog leave us some love! Thank you so much!


This month I added a few supplies for my design. I have them listed at the end of my post if you want to see what I used. I took some of the elements and changed them up as you can see from my photos.

I took some of the cards apart and used them in my layer. I stamped the lotus flowers and made my own background. Then I popped that layer up with the Stampin’ Dimensionals from the kit. Added the bling that came in the kit.

I loved how the kit invited make a card using the lotus flower. I took a die and used that part in my card and placed that on top of my stamped layer. Then I decided it needed a little more. LOL! So, I stamped the big image stamped off once to get a softer look. I feel it added just the added touch it needed!

I thought why not change it up and add a magnet to the back using the Tear and Tape in the kit so it can be displayed in a different way! I made a card front instead of a full card.

I stamped the sentiment You rise above the rest on the layer that I die cut out. Then I just simply cut it out by hand and attached with Tear and Tape.

 The cool thing about this blog hop is to get you inspired! I get so many ideas myself as I go through the blog hop too!

Enjoy the rest of the blog hop!


SUBSCRIPTION INFORMATION FOR NEXT KIT

Subscribe to the August Paper Pumpkin Kit between 11 August and 10 September 
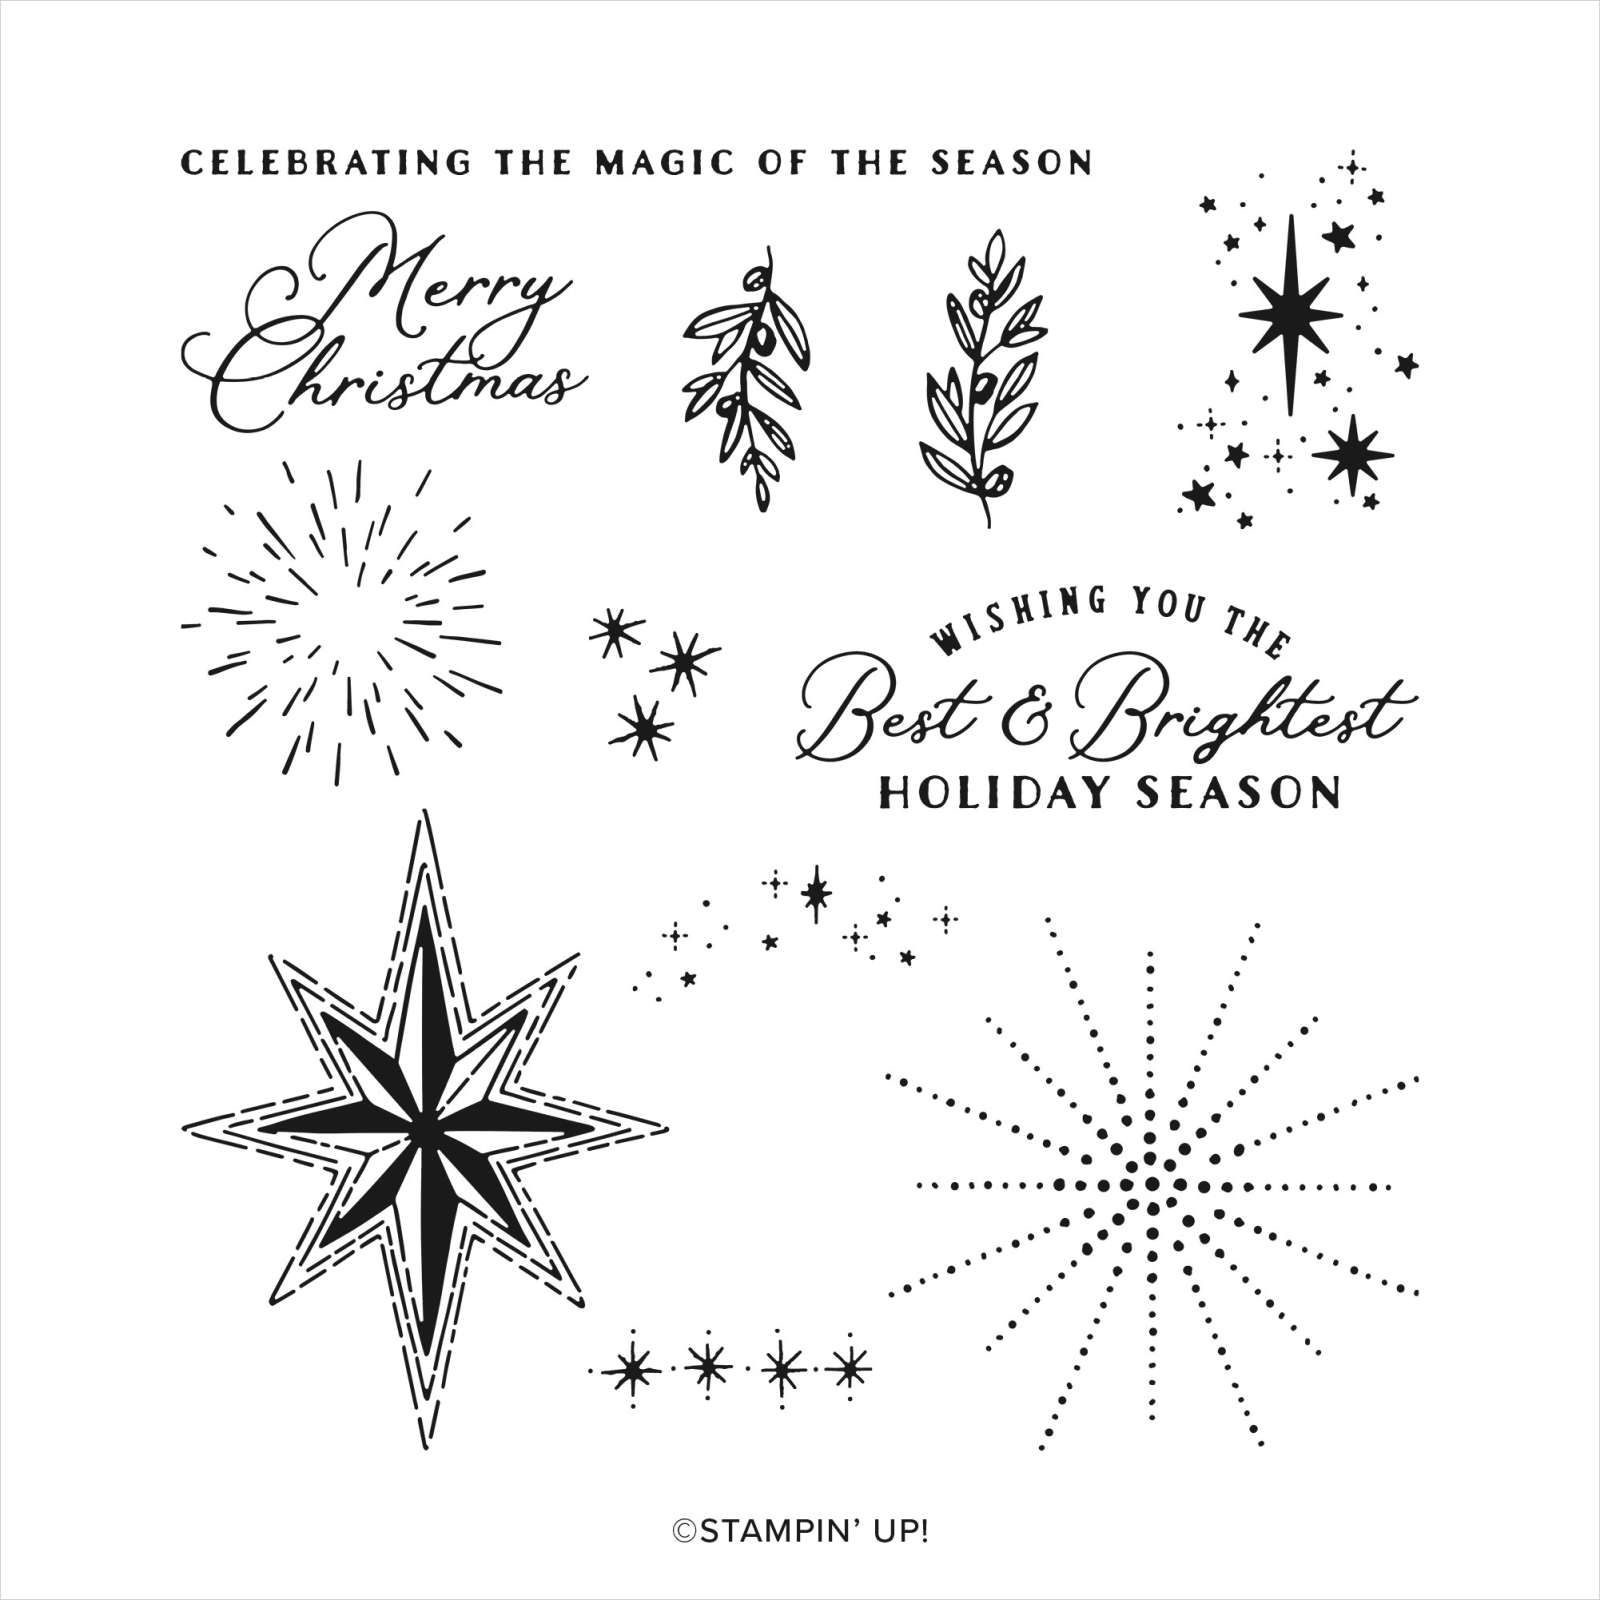
 

ABOUT THE KIT

Kit Name: With Love & Gratitude

This kit includes:

  • 8 treat packages

  • 8 note cards

  • 8 coordinating envelopes

  • 1 photopolymer stamp set

  • 1 Lost Lagoon Ink S

  • pot

  • Specialty gold foil, precut embellishments

  • Adhesives

  • Finished treat packaging: 3-1/2″ x 5″ x 2″ (8.9 x 12.7 x 5.1 cm)

  • Final card size: 3-1/2″ x 3-1/2″ (8.9 x 8.9 cm)

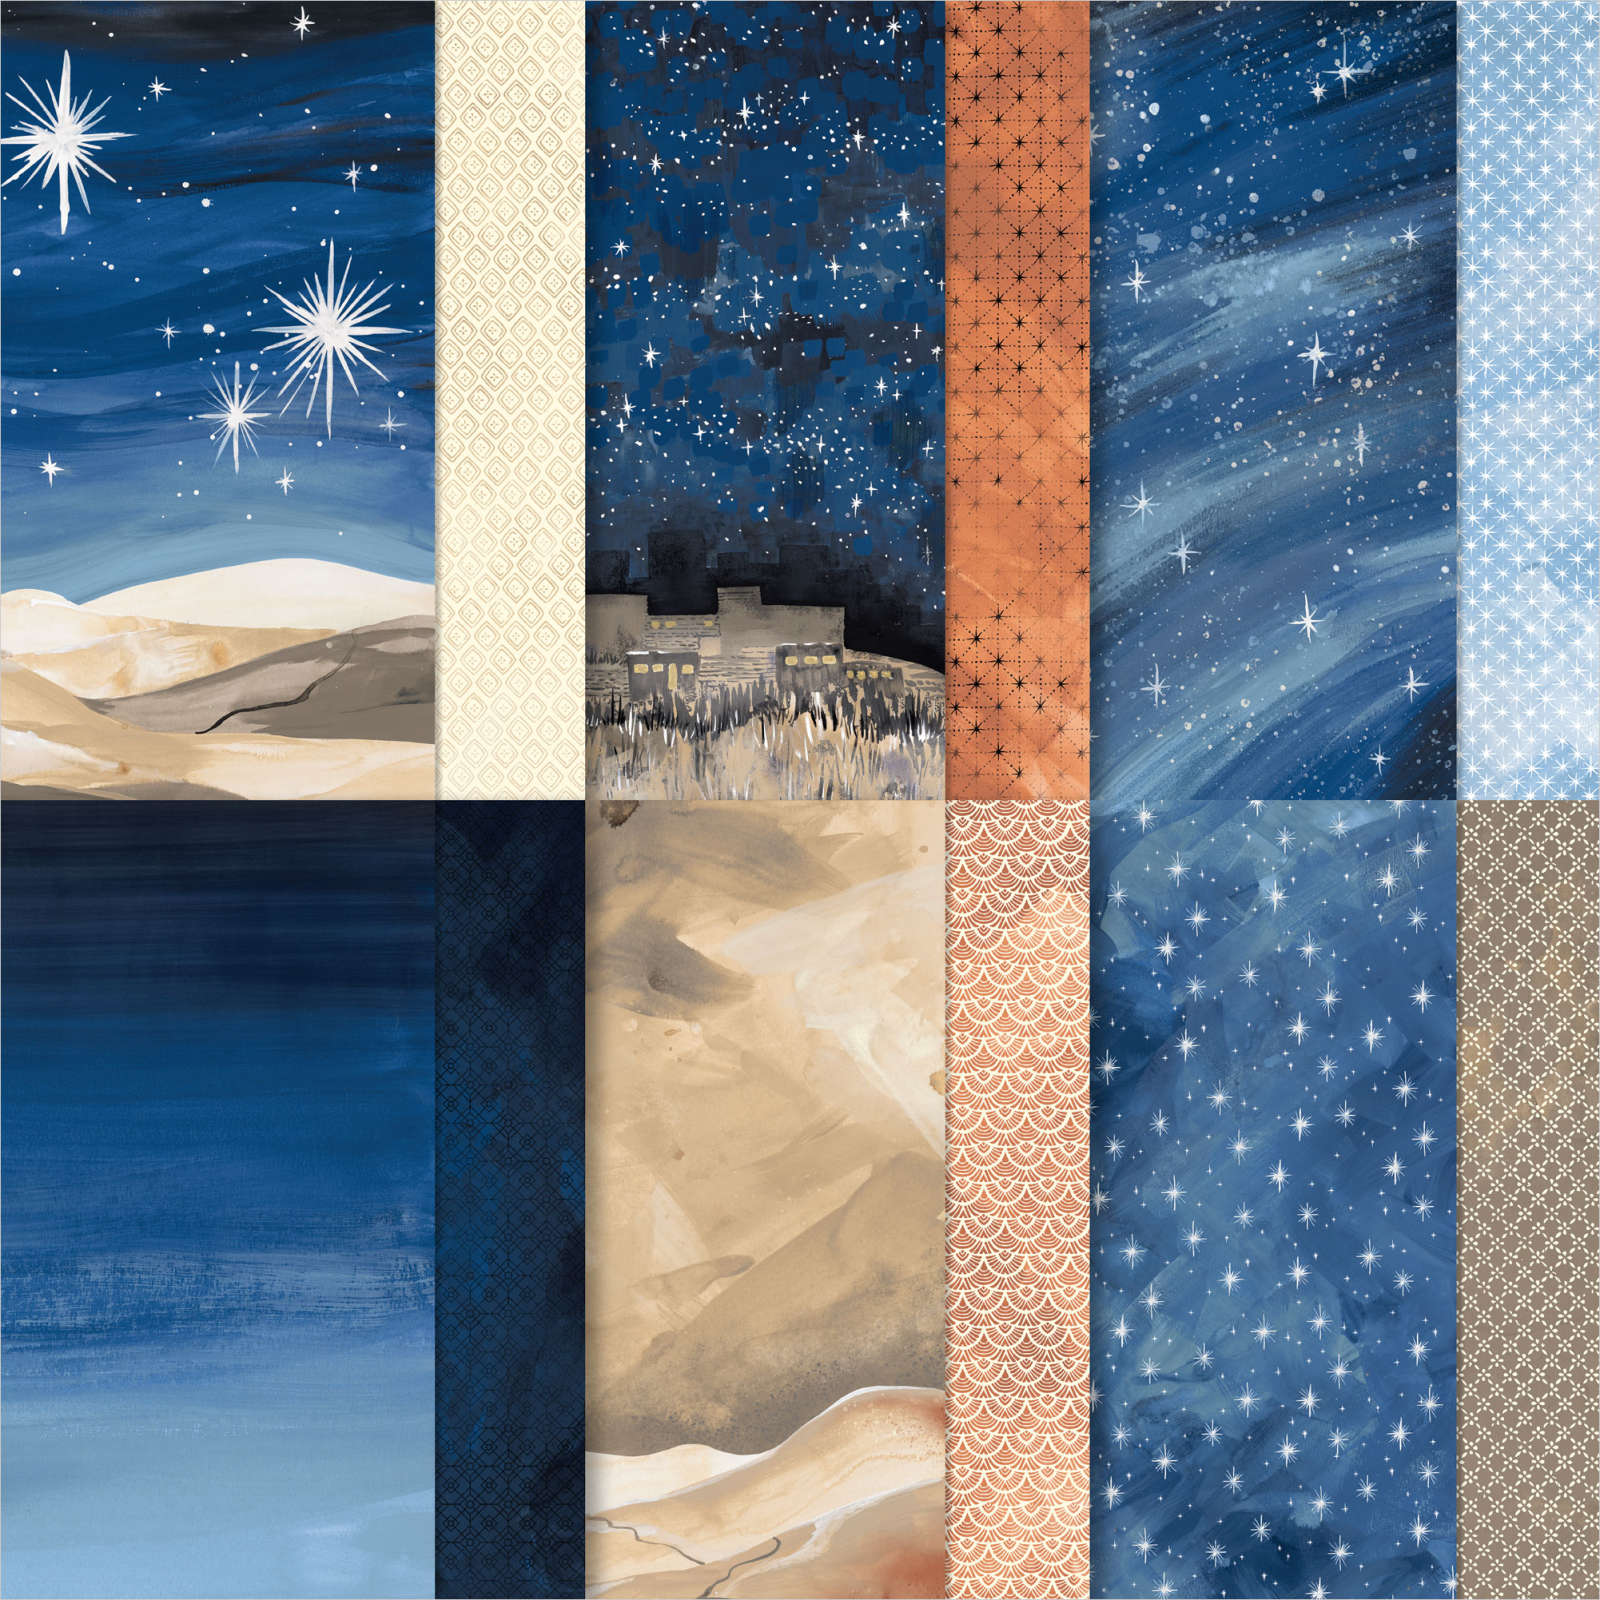
  • Coordinating Stampin’ Up! colors: Copper Clay, Crumb Cake, gold foil, Lost Lagoon, Mossy Meadow, Pebbled Path


Blog Hop Index

Product List

CASE-ing Tuesday #414 Sentimental Park Stamp Set

My card was CASE’d from page 75 of the 2023 – 2024 Annual Catalog. Each week we makeover a card from the current Stampin’ Up catalog and then share it on our Facebook Group. You can join our CASE-ing Tuesday Facebook Group to see more samples and/or share your own card with us. It’s a great way to improveh your stamping and challenge yourself to try new styles. I hope you will join us!

.At the bottom of my post are the supplies that I used to create my card. The sketch is actually to make a note card size. I decided to make it into a full sized card. That is the awesome thing about a sketch it can be used however you want to!


Thanks for stopping by today! I am back to sharing more inspiration! 

Product List

Paper Pumpkin Possibilities Exploring In Color


Paper Monthly Blog Hop


Time for this months Paper Pumpkin Possibilities Blog Hop with my fellow Stampin buddies!  As you hop along you will see alternative ways we have used the to share more ideas using the kit. We all love comments! So, as you hop to each blog leave us some love!

This month I only used the supplies that were in the kit for my design. It doesn’t need to take you a long time to make a fun creative card especially with Paper Pumpkin kits. I knew I wanted to keep the fun design that already was provided in the cardbase, So, all I did was trim 1 1/2 ” off the right side. Then glued that on the inside of my card to continue the cool scenery.

Especially with Paper Pumpkin everything you need is all inside the box. The cool thing about this blog hop is to get you inspired! I get so many ideas myself as I go through the blog hop too!

Enjoy your next stop along the hop to my friends Janey’s awesome blog for more inspiration from this months kit. 


next button


Paper Pumpkin Possibilities All the Little Things

Paper Monthly Blog Hop


Time for this months Paper Pumpkin Possibilities Blog Hop with my fellow Stampin buddies!  As you hop along you will see alternative ways we have used the to share more ideas using the kit. We all love comments! So, as you hop to each blog leave us some love!

This month I only used the supplies that were in the kit for my design. It doesn’t need to take you a long time to make a fun creative card especially with Paper Pumpkin kits. I  knew I wanted to design a card using the pretty flower die cut as the focal point 

Especially with Paper Pumpkin everything you need is all inside the box. The cool thing about this blog hop is to get you inspired! I get so many ideas myself as I go through the blog hop too!

Enjoy your next stop along the hop to my friends Debbie’s awesome blog for more inspiration from this months kit. 

next button


ABOUT THE MAY KIT

CLICK ON THE PHOTO TO SIGN UP BY MAY 10th!

Name: Exploring In Color

This kit includes:

  • All the supplies you need to create 9 card, 3 each of 3 designs, plus 9 coordinating envelopes.
  • A 7-piece all-occasion stamp set that celebrates good friends and great adventures!
  • 1 Copper Clay (new In Color!) Classic Stampin’ Spot.
  • Twine and die-cut accents
  • FREE stickers to put on your projects or anything you want—water bottles, laptops, coolers, and more!
  • Finished card size: 4-1/4″ x 5-1/2″ (10.8 x 14 cm).
  • Coordinating Stampin’ Up! colors: Boho Blue, Copper Clay, Daffodil Delight, Moody Mauve, Mossy Meadow, Pebbled Path, Wild Wheat


Paper Pumpkin Possibilities Tens Years of Growth

Paper Monthly Blog Hop


Time for this months Paper Pumpkin Possibilities Blog Hop with my fellow Stampin buddies! As you hop along you will see alternative ways we have used the to share more ideas using the kit. We all love comments! So, as you hop to each blog leave us some love!


I wanted to concentrate on using most of the supplies that were in the kit for my design this month. It doesn’t need to take you a long time to make a fun creative card! I knew I wanted to design a card using the pretty flower and leave die cuts! I just added the Opaque Adhesive- Backed Gems to my card.

Especially with Paper Pumpkin everything you need is all inside the box. The cool thing about this blog hop is to get you inspired! I get so many ideas myself as I go through the blog hop too!

Enjoy your next stop along the hop to my friends Deb’s awesome blog for more inspiration from this months kit. 


next button

ABOUT THE APRIL KIT

CLICK ON THE PHOTO TO SIGN UP BY APRIL 10th!


Name: All the Little Things

This kit includes:

  • 9 cards, 3 each of 3 designs, and 9 coordinating envelopes.
  • 1 photopolymer stamp set with celebratory sentiments.
  • 1 Shaded Spruce Stampin’ Spot.
  • Precut cherry blossom paper pieces with iridescent foil.
  • Unique embellishments and twine.
  • Adhesives to complete the projects.
  • Final card size: 5-1/2” x 4-1/4” (14 x 10.8 cm). 
  • Coordinating Stampin’ Up! colors: Balmy Blue, Basic Black, Calypso Coral, Granny Apple Green, Petal Pink, Poppy Parade, Shaded Spruce.
  • FREE box organizer